
Introduction to the Bambu Lab A1 Combo
The Bambu Lab A1 Combo is a user-friendly 3D printing solution combining high-quality printing with multi-filament capabilities. This comprehensive guide provides a step-by-step walkthrough of the setup process, ensuring a smooth experience for beginners and experienced users alike. Whether you're interested in FDM 3D Printing or exploring multi-color prints, this guide will cover everything from unboxing to your first successful print.
Unboxing and Initial Inspection
Inventory Checklist
Upon receiving your Bambu Lab A1 Combo, carefully inspect the packaging for any signs of damage. Open the box and verify that all components are present. The A1 Combo package typically includes:
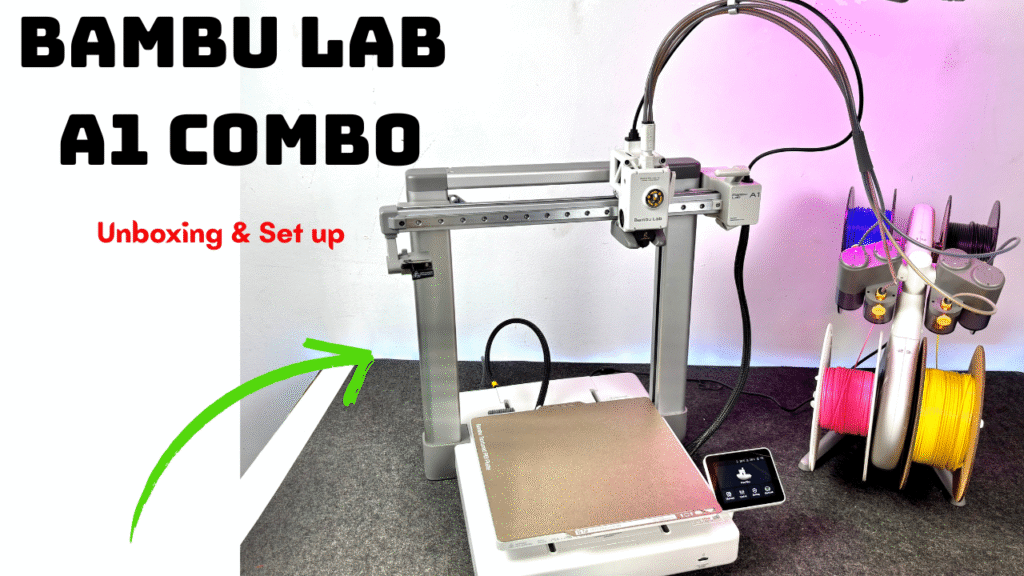
- A1 3D Printer
- AMS lite (Automatic Material System)
- Spool Holder
- PTFE Tubes
- Power Cord
- Accessory Box: containing spare parts, tools (Allen keys), and sample filament.
- Print Bed (pre-installed)
Safe Removal from Packaging
Follow these steps to safely remove the printer from its packaging:
- Carefully cut the straps securing the box.
- Open the box and remove the top foam padding.
- Important: Do not lift the printer by the X-axis. Grasp the Z-axis bracket instead.
- Carefully lift the printer and place it on a stable, level surface.
- Remove all protective foam and plastic wrapping from the printer and AMS lite.
Assembly: Printer Base and Frame
Connecting the Base Housing
The A1 requires some minor assembly to get started:
- Unlock the Heatbed: Locate the zip tie securing the heatbed at the bottom of the printer. Cut the zip tie to allow free movement of the heatbed.
- Attaching the Base Housing: Tilt the base housing at approximately 45 degrees to align it with the printer frame.
- Securing the Base Housing: Use the provided ST3-23 screws (12 total) to secure the base housing to the printer frame. Ensure all screws are tightened securely.
- Installing the Y-Axis Rail Cover: Locate the Y-axis rail cover and slide it into place, protecting the Y-axis linear rail.
Cable Box Connection
- Connecting the Cable Box: Locate the cable box and its corresponding connectors.
- Color-Coded Harnesses: Connect the color-coded harnesses for the X motor, Z motor, and camera.
- USB Cable: Connect the USB cable in the cable box. Do not force the Type-C cable into its slot.
- Securing the Cable Box: Use Screw A (1PCS) to secure the cable box to the printer frame.
AMS lite Setup
Assembling the AMS lite Stand
- Attaching the Rotary Spool Holders: Attach the rotary spool holders to the AMS lite stand using the BT3-6 screws (4 total).
- Positioning the AMS lite: Place the AMS lite in a convenient location near the printer, ensuring sufficient space for filament spools.
PTFE Tube Connections
Proper PTFE tube configuration is crucial for reliable filament feeding:
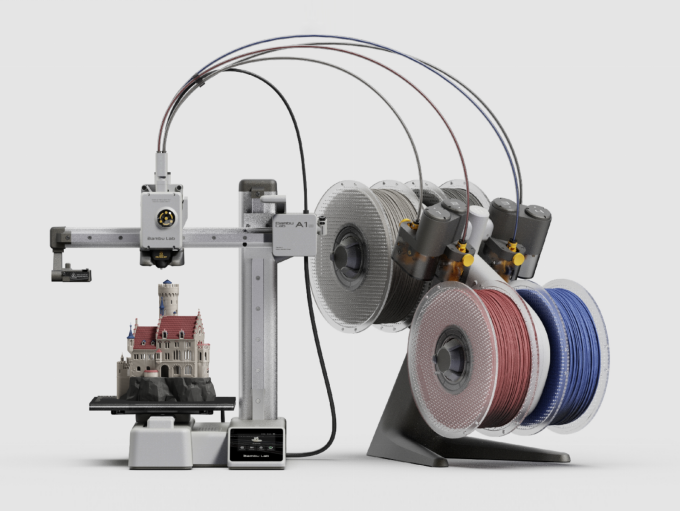
- Tube Lengths: Use the two shorter PTFE tubes for AMS lite ports 1 and 2, and the two longer tubes for ports 3 and 4.
- Connecting to the Toolhead: Connect the PTFE tubes from the AMS lite to the toolhead.
- Silicone Organizer: Properly place the silicone organizer on the PTFE tubes to minimize feeding resistance.
- Tube Management: Adjust tube lengths and angles to prevent excessive bending and potential feeding failures.
Initial Calibration and Setup
Powering On and Initialization
- Connect the power cord to the printer and plug it into a power outlet.
- Power on the printer using the power switch.
- Follow the on-screen prompts for initialization and calibration. This process may include bed leveling and nozzle calibration.
Wi-Fi Connection and Bambu Handy App Binding
- Connect the printer to your Wi-Fi network following the on-screen instructions.
- Download and install the Bambu Handy app on your smartphone or tablet.
- Follow the instructions in the app to bind your printer to your Bambu Lab account.
First Print
Loading Filament
- Select a filament spool and place it on one of the AMS lite spool holders or the external spool holder.
- Follow the on-screen prompts or use the Bambu Handy app to load the filament into the printer.
- Ensure the filament is properly loaded through the PTFE tube and into the extruder.
Selecting and Starting a Print
- Choose a pre-loaded print file on the printer's screen or upload a G-code file using the Bambu Studio software.
- Purge Container: Place a container below the purge wiper to catch filament purges.
- Initiate the printing process. The printer will begin heating up and start printing.
- Monitor the first layer to ensure proper adhesion to the build plate.
Maintenance and Troubleshooting
Regular Maintenance
Regular maintenance is crucial for maintaining print quality and prolonging the lifespan of your A1 Combo:
- Cleaning the Build Plate: Clean the build plate regularly with isopropyl alcohol to remove residue and ensure proper adhesion.
- Nozzle Cleaning: Periodically clean the nozzle to prevent clogs.
- Lubrication: Lubricate the lead screws and linear rails with appropriate lubricant.
- Firmware Updates: Keep the printer's firmware up to date to benefit from the latest features and bug fixes.
Troubleshooting Common Issues
- Nozzle Clumping: Increase the nozzle temperature slightly or try a cold pull.
- Build Plate Detection Problems: Ensure the build plate is properly installed and clean.
- Heatbed Cable Issues: Ensure sufficient space around the printer, especially at the rear, for heatbed cable movement.
- Filament Feeding Issues: Check for obstructions in the PTFE tubes and ensure the extruder gear is clean.
Additional Resources
For more advanced settings and customization options, explore the Bambu Studio software. You can also find helpful tutorials and community support on the official Bambu Lab website.
If you're interested in exploring professional 3D printing services, consider our 3D Printing Service at Printie 3D.